vrijdag 19 juni 2015

Birthday Calender


Hi!

So the other day I was looking for a birthdaycalender and I found a really pretty one on a blog. It's a very simple (just black and white), but really nice one if you ask me and that's why I wanted to share it with you! You can find it here. Also looking for a birthdaycalender, but this one doesn't fit your taste? Just take a look on Pinterest, they have loods of nice birthdaycalenders!

Hoi!

Pas was ik op zoek naar een verjaardagskalender en via Pinterest vond ik een mooie op een blog. Het is een hele simpele (gewoon zwart en wit) maar erg leuke kalender naar mijn idee en daarom wilde ik hem met jullie delen. Je kunt hem hier vinden. Ook op zoek naar een verjaardagskalender maar is deze niet je smaak? Er zijn superveel leuke kalenders te vinden via Pinterest!


dinsdag 16 juni 2015

DIY Food | Macarons


Hi! I have a nice recipe for you: macarons! They always look so nice in al these radiant colors. I had never tried them and was so curious how they tasted. So when me and my girls had planned a high tea/high wine where we al were supposed to make something, I decided to try and make macarons!

I used this recipe (with nice tutorial-video) (it's in Dutch, but maybe you'll understand it. If not, let me know and maybe I can find you one in English!)

It took me quite some time, but it was really fun to do. Maybe they didn't turned out as round as you can find them in the shops, but they tasted really delicious. So, if you are bored or want to make something delicious and original for a birthday or something I recommend you to try macarons!

x


Hoi! Ik heb een superleuk en lekker recept voor jullie: macarons! Ze zien er altijd zo leuk uit met al die kleurtjes. Ik had ze nog nooit geproefd en was erg benieuwd hoe "die dingen" nou smaakten. Dus toen ik en mijn vriendinnen een high tea/high wine organiseerden waar we allemaal wat moesten maken, besloot ik om te proberen macarons te maken!

Ik gebruikte dit recept (met handige tutorial-video).

Het kostte wel wat tijd, maar het was erg leuk om te doen. Daarbij zagen ze er misschien niet zo mooi rond uit als in de winkel, maar smaakten ze wel echt heerlijk. Een aanrader dus als je je een keertje verveeld of iets lekkers en origineels wilt maken voor een verjaardag of iets dergelijks.

x

woensdag 12 februari 2014

DIY | colored iPhone cable charger

Before (source)


After

Needs:
-charger
-colored thread
-scissors 
-some patience

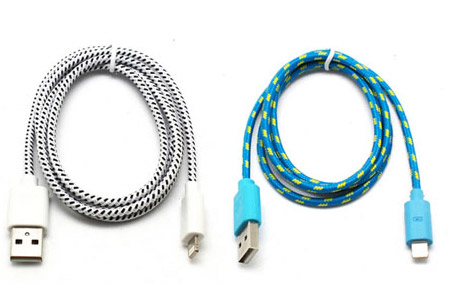
I want to share this very nice and easy DIY with you.  I came across some really cute looking iPhone chargers. They looked like the ones beneath.Unfortunately, when I found them, they turned out to be pretty expensive. 
Image 1

After that I thought to myself, let's Do It Myself, it shouldn't be that hard to make my own version. And so I did. You just choose the colors you like, put them next to each other and then you keep turning the thread around the charger till you're at the end. I hadn't had enough blue thread, so in the middle I changed to pink/silver. You could do this with every charger offcourse.
Here are some pictures of my DIY-project.


What do you guys think of my DIY cable chargers? Are you going to do it yourself? If so, please show me your creations! And if you have any questions, don't hesitate to ask them!


zaterdag 7 december 2013

Creative evening - DIY

I have a see-through IPhone case. And tonight I made some new backgrounds/covers to go in there. This is a perfect way for me to: 1. not spend that much money on every iPhone cover I like, 2. getting creative every once in a while and 3. being able to change the "cover" of my iPhone, since I like to change a lot. I think it's awsome and it's very easy to do, so you can do it as well! You just need a see-through cover, some ideas and some paper. You can design it yourself, but offcourse you can also look up a picture you like on the internet. 
Tonight I made these:


Any questions about this nice DIY? Just ask me!

dinsdag 15 oktober 2013

Louboutin nails

Last week I tried the Louboutin nails. I saw them somewhere and I thought it looked pretty cool.


And so it came that I tried them for myself last week. I have one important tip for you: make sure your nails are long enough so that you can see the redness easily. Also, use a bright red color, so it will pop out. (I used color riche 404 scarlet vamp from L'Oréal and I think this one was to0 dark ).

Klik hier voor een duidelijke tutorial van LaVivaBeauty.

woensdag 6 februari 2013

Ocean-inspired


So, I was feeling inspired and did my nails. My inspiration was the ocean. No trics or helps, I just did it! So try for yourself!

vrijdag 24 augustus 2012

Arty nails


For the how-to, click here
It's not the site I used, but I couldn't find that one anymore and this one comes pretty close to how I did it. Have fun and enjoy your lovely look!

zondag 24 mei 2009

DIY/New trend: Tie-dye

A new trend, seen on the runway: tie-dye-effectA t-shirt the tie-dye-way


(1) Balenciaga Tie-Dye Top (£670); (2) Top Shop Silk Tie Dye miniskirt (£25); (3) Oli Dip Dye Frill Sleeve Dress (£29); (4) Stella McCartney Tie Dye Bag (£375 on sale); and (5) Society for Rational Dress Tie Dye Pants ($163 on sale)


Matthew Williamson Tie-Dye Dress

Nice t-shirt with heart.


DIY:Tie-dye!

Spiral

Perhaps the most iconic tie-dye pattern, this style is achieved by creating pleats of fabric all stemming circularly from a central point. Once you fold the fabric into pleats, compress it into a bun and tie it into shape. After it’s dyed and released, the fabric will have a vortex-like spiral pattern.


Circle


Similar to the spiral, this pattern is created by choosing a central point on the fabric around which the circles will revolve. The fabric is picked up at this point and arranged into neat and evenly spaced pleats running down the length of the fabric. It should loosely resemble a closed umbrella. Tie the fabric to maintain its shape when dyed. The resulting pattern will have colorful concentric circles.Randomly spaced circles can be created by gathering fabric into individual bunches along the surface and tying them separately. The resulting circles will be separate from one another, but can be coordinated creatively into unique patterns.


Random

This pattern will yield the simplest and most free form results. Simply gather the fabric into small bunches and then mold them together into a compressed ball. There is no formula to this method and should be used to create a simple and randomly dyed pattern. The number of colors and tightness of the ties will affect the complexity of the pattern.

Stripes
Stripes can be achieved in multiple ways. To create a softer and more gradated pattern simple roll your fabric loosely lengthwise or widthwise into a long tube. Tie the roll of fabric at intervals depending on the desired width of the stripe and then immerse the sections in the desired color of dyes.Bold and geometric stripes can also be created through pleating and folding. Simply fold the fabric in the desired widths of stripes and fasten and dye them accordingly. Stripes can run parallel to each other or intersect to create a wide array of shapes. Intersecting stripes are popularly used to create V’s, X’s, and with circles to created the iconic peace sign.
you can also watch a film on youtube like this one:
Have fun tie-dying!